Thursday, February 19, 2009

portion numero cuatro


Four cans of yellow later, i had a glowing bici-maquina blinding me with its neon glory. Yellow was not the best color to try to paint over dark brown with, but also my techniques were wasteful according to Carlos- he showed us how to use the cans properly, i think it would have saved me a can.


Without orange spray paint i had to use the orange paint from the shop. The problem with this was that every single brush was dead, dried hard as a rock, chock full o´paint. Not wanting to repeat the look of other non-spray painted items, i thought the best way to get it looking nice would be to dip it in the paint. But without enough paint or a large enough basin to do it in, i decided it would be a brilliant idea to pour the paint on. And blow it around.


It looked pretty good when wet, nice and thick, covered all of the flaws of the wood that i couldn´t sand out. I´d just have to wait for it to dry.

Come morning, my Pollock-onian experiment proved worthless, the paint was all cracked and ugly, it absorbed heavily into the wood in some places, not at all in others. It was an ugly mess. So i did the only logical thing, i poured more paint on it.

Oh, and i found a fan to encourage its dry time.


But, by one in the afternoon- on the day of the presentation- it was clear it wouldn´t dry in time. (two days later its still not dry). So i cut another pice of wood, fitted it, drilled, reattached the hub and spray painted it to a nice mellow orange creamsicle.

When i set the table on the bike i discovered that it had somewhow ended up un-level. So in Guatemalan mode, i looked around for a piece of metal, any piece of metal, roughly the right size to prop up the drooping corner. A nut sufficed.


Not a good weld, my first attempt blew a hole right through the square tube. We were running out of time, Carlos had to be called in, quick. Three bzzzzt´s and we were back in business.

Meanwhile in the background, several others are churning away at the peanut de-sheller. Mixing concrete and getting all kinds of messy.


The concrete was pusehd into a series of molds to form the necessary series of cones for the de-shelling process.

The leftover concrete, Carlos instructed, was to be put into a bike wheel while he was at lunch. Neither Anneliese nor I felt particularly confident about this considering that we´d never done it, and really weren´t sure. But the wet concrete had a natural countdown in place and demanded action. Right then, Johana showed up, she knew that the bottom needed water sprinkled on it, and that the whole wheel could be turned back in forth in place to settle the concrete.

With these two necessary procedural steps in place i took over and finished the job. I had seen Carlos smooth out previous fly wheels with a small wooden block, i found it and patiently pushed all the concrete just as it should be. It was a slow and satisfying process.

Once the glaring glow of my machine was dry i uncovered the pedals and attached the rest of the pieces, minus the handlebars.

If you are wondering what that small red circle is, its a prop to go underneath the base of the blender. It turns out the a miscalculation was made and the hub came up too high, forcing the base of the blender up off of the wooden table. The red donut fixed that.


I then went on to the handle bars. Since i had the yellow and orange, i thought it would be nice to have a couple hints of red, the donut and the handle bars. I bought some electrical tape and wrapped the handlebars with it. I really like the way it came out, especially when its on the bike.


Wednesday, February 18, 2009

preparing - continued

Shalom,
Installment number three:

By this time the genders had separated, unintentionally, into teams to complete the two bici-liquadoras. Well, my team was actually just me, what with Palo being who knows where.

The starship trooper alien bugs each needed a final leg attached, both for stability and to house the seat post. And as the sole representative of my sex i declared Team Man ready to go.

First i ground out a crescent in the bottom tube of the bike frame. This was to maximize contact between the pieces of metal and encourage a better weld. It took some time to get the top crescent and bottom crescent just right, the both had to line up to create the space for a true and plumb seat post.


Then the top tube (this being the word i was so painfully struggling for two posts ago) which i had previously removed needed to have the tube of the headset (not the header) welded to it to provide enoguh height for the seat post. In my inexperienced mind i thouhgt, i`ll just tack weld the two together and then bend it into place. So i did, but it did not.


When i went to bend it, knowing nothing of how the tube was constructed, the top part stayed and the rest, to my chagrin, popped off. Grrrrr.


So i hammered it off and started again. This time I was sure to weld the little bugger to the tube. My tack weld bend strategy worked well the second time around and i got the thing looking pretty straight.

Though with an unnattractive- but still strong- weld. The learning curve isn`t the smooth parabola that Mr. Teacher`s graph would like you to believe it is. Its a bumpy oscillating general upward trend.


I then cleaned it up some on the grinder, and stuck it to the rest fo the machine. Also not the prettiest weld on the block (it was last to be asked to prom) But a fair amount of grinding got it looking a little better.


I then ran into a problem that i`m not sure Carlos factors in during construction- the floor is not level. This translated into a rear seat post/ third leg that didn`t touch the floor. I wouldn`t have known had i not sat on it and almost fallen backwards.


With this new realization in mind i took it over to the most level spot i could find- the tile floored section of the hallway- to check it out there. I needed to remove just a little teeny tiny bit from the the center post. I ground it down, but apparently too far, transfering the important job of floating from the back to center. It also was pretty unstable side to side. Unsure of how importnat or not the center post was i decided to leave it for the morrow, moving on to the rear stablization.

I found some angle iron to run perpendicular to the bike, a measure that would surely stop the rocking. The iron was too big to put in the table cutter, so i had to use the hand grinder. The one of frequent use was too small, largely due to its frequent use. I fishec out a big one from the tool box and, boy, was it big. I don`t think my picture can do it justice. It was like holding up a 20 pound large-mouthed bass. (I was tempted to pose with it like my catch, but holding it by the cord is bad for it, especially with all that weight).


I set the iron against the bike, leaving the cut end to fall off, which is something you have to do to avoid pinching the blade and a possible kick back (not good).


Once cut i made a tack weld and took it to the level spot. I could see it needed slight adjustment. Hammering helped there. When set i took it back and welded it all on.


After I decided to get the seat post set up. First i cut a small slit in the top of the tube, this allows the tube to constrict and hold the seat post steady. I then put on the hardware i had pulled from another bike, it didn`t quite fit, so i jammed it open knowing that i could squeeze it back into pladce with the screw.


What i failed to take into account was the fact that the bolt for this apparatus is specially designed to fit and not move on one end (to make taking it on and off easier by only needing one hand to do so). This made it shoot off at an angle and miss the opening on the other side. So i tried to opend the other hole with a drill, it proved to slow and i thoughti might be wrecking the drill bit, so i just notched it out with the hand held grinder. Probelm solved. Uglyily.


Having the seat on I was curious to see the rest of it together, so i cut some square tubing Carlos left for me, set the tray on and found some decent handle bars.


The rustic DIY look actually really spoke to me, i like the slick painted ones too, but this felt a little more bad ass, like, i just dumpster dived me blender machine, uhhh, what!

But the dirty home-made look isn`t fashionable here like it is in the states, where people don`t have money they`d much rather look like they do. Which makes me wonder why so many of us in the states like looking like we don`t.


I opted for yellow.


I also opted for spray paint after seeing how the brush method faired.

getting ready to talk to some tourists

Bon Gornio,
Welcome to Part Duex.

The next step in the bici-maquina-making process was to attach the rebar pieces i had so enthusiastically bent. My welds were fast and accurate, filled with a small sense of pride i showed Carlos who, much to my satisfaction, exclaimed that they were his welds. The picture isn´t the best, but you can see my lesson paid off.


Anneliese and i took turns welding away, it was great fun for both of us.


The next step in construction was to make a small wooden table for the blender to sit on top of. Carlos gave me rough dimensions from which i cut a round-cornered square. My days as a novice carpenter had me wishing for an orbital sander to clean the thing up, you know, get it looking good (shaving a 64th off of most ugly wood can bring it miraculously back to asthetic life) But there is no such sander, just a metal grinder which i used to smooth out the corners some. Maybe we can find Carlos an orbital sander somewhere.


Carlos then placed the hub, showing me approximately where it would sit. He then measured out on the wood, drew a mark and commanded "cut."


So i drilled holes in all of the wooden tables, three in total, and moved on to the hubs. From my experience de-constructing a liquadora several weeks prior, i knew that each hub would have to have four of its spoke holes widened to accomodate a screw. So more drilling, and then onto attaching.


The odd part about this process is that we didn`t actually have any screw short enough to not pop out the other side and look terribly un-professional. Again from my intimate moments with the liquadora i knew that i could cut a screw in half, sharpen the new end and it would, more or less, function. Holding the screws to the grinder was a little difficult, in part because of their size but mostly because the grinding heats them up fast. It was a good incentive to be economical with my passes.

After sculpting several new screws, predrilling and attaching the hub to the bike-sized table, i moved on to the base.

Each bike needed to have more rebar bent to connect the two forks at the front of the bike. This is for added stability and overall durability. More good muscle use ensued.


They almost look like stickly little animals, dinosaurs, or those weird bug aliens from starship troopers.

Sunday, February 15, 2009

More bicimaquinas in one week than all of last month

.
For the past week we´ve all been working on a few bicimaquinas for an upcoming presentation in Antigua. I´m not sure i understnad exactly, but i think that the machines are being sold to the a cafe in the epicenter of Guatemala´s tourism industry. (Antigua is a huge magnet for travellers because it is absolutely stunning). While we are there we´ll demonstrate the machines to interested tourists and speak about what Maya Pedal does.

For the presentation we´ve been working on two stationary liquadoras, one rear mounted liquadora (to function on the back of a working bike), one grain mill and a peanut de-sheller. I and the girls have had our hands in the liquadoras for the most part, we´re trying to finish them up this weekend. Carlos didn´t leave us with any instruction, just an expectation. At first i felt a little flustered, but then i realized that its because he trusts us to do it, which feels really good. If Carlos approves, you know you´re set.

There´s a lot that´s happened, so much that its kept me from writing about it. It´ll have to come in several parts, or it will be too massive. Epic, epic is a good word. It would be too epic, and totally unreadable.

So, welcome to part one.


Erin and Anneliese stripped two women´s bikes to their bare frames. These are to become the liquadoras Carlos tells us. I ask why women´s bikes in particular, he says because they never sell. This was interesting to have pointed out, becuase its true but i never noticed it- there are bicylces everyhwere, but not with women on them.

After all the unecessary stuff had been removed, the bar, ahh, i don´t know what its called, the top bar, the one that goes from the seat post to the header, that one. It needed to be cut off. Once it was off, i ground down the remains as best i could with the hand grinder. Not too pretty but better than it was.


Next i had to find two, roughly, matching sets of forks to create the base for the maquinas. At first i thouhgt i was looking for ones as angled as the ones of the other bicimaquinas shown below. I did the best i could, but none were so extreme. Then carlos pulled out this crazy tool and told me to bend them, which succinctly sums up Carlos´style- if it doesn´t fit, make it.


After bent, the forks needed to be cut to the same length. Like so:


When preparing to weld to bike tubes, its important to grind off the paint. This serves two functions, one it makes a better weld, two it keeps you from inhaling toxic paint fumes. I un-painted the back of the frame near the drop outs, this is where the forks will make contact.


This is the approximate placement of the fork.


Next was to weld the forks on to the frame. I wasn´t sure where Carlos wanted them, angle wise, so i asked him to tack weld them on where he wanted it. He obliged, and i finished the rest. My welds weren´t so bad this time, definitely better than previous attempts.


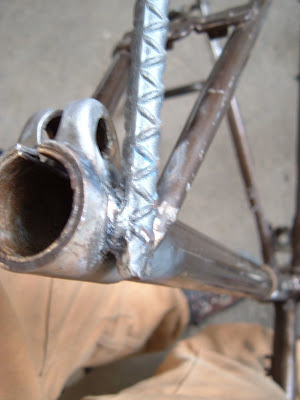
However, when it came to welding the support tube underneath the bottom bracket i totally botched it. Carlos laughed and offered me a much needed lesson.


Bike tube is pretty hard to weld to, especially doing stick welding. Its really thin and if you spend to much time on one spot you blow a hole right through it. It just melts away.
As you can see i did a pretty terrible job. But Carlos showed me that if you do litle spurts, taps almost, you can extend from the bead that you´ve already put down and fill the hole. It also helps to have some additional metal in there- he grabbed a broken spoke to add more material to the mix. Once he demonstrated i tried my hand at it and actually got it to work, which was awesome.

The support post i´m describing looks like this on a completed bici-maquina


When all were securely attached they looked like this-


The blender portion sits on top of a piece of wood fastened to rebar. Carlos instructed me to bend two pieces of rebar per machine and weld them into place.

Bending them was a fun process, it involved a lot of focused muscle power, something we Americans don´t get to do on a daily basis. Its amazing how my people have all but erradicated the physical work from work. And then feel compelled to go to the gym to make up for it. (I recently finished an excellent book that delves deep into this issue, highly recommended- Better Off, by Eric Brende)

If only i had three arms.


Here´s both side by side, you can see one of them sits a little crooked. The perfectionist in me wanted to straighten it out, but Carlos said not to bother. Good enough is up there with if it doesn´t fit make it.


Meanwhile, in the background of welding flashes and spark showers, Palo skillfully widdled away at the bolt-to-become-blade-spinner. Turning the top of the round bolt into the necessary square shape.